
Support
Installation instructions, system requirements and AutoPitch settings. For account or plugin issues, contact hello@sparkaudio.org.
Install on Windows
The AutoPitch installer puts the VST3 plugin where your DAW can find it. You can also install the standalone app to use AutoPitch without a DAW.
-
Download AutoPitch
Sign in to your Spark Audio account, verify your email and choose Download for Windows. Save the .exe installer to your computer. Downloading does not start your trial.
-
Close your DAW and run the installer
Save your session and close your DAW before installing or updating. Run the downloaded installer and choose whether to include the standalone app.
-
Follow the setup steps
The installer puts AutoPitch in the standard VST3 folder automatically:
C:\Program Files\Common Files\VST3Windows asks for administrator permission to install into Program Files. You do not need to move or extract any plugin files yourself.
-
Rescan plugins in your DAW
Open your DAW’s plugin manager and run a rescan, or restart the DAW. Load Spark AutoPitch as an audio effect on your vocal track.
-
Activate AutoPitch
Choose Activate AutoPitch in the plugin. Your browser opens so you can sign in and approve your computer. Return to AutoPitch when connected. If eligible, your 30-day trial begins when activation completes. The optional standalone app uses the same activation.
Updating later? Save your session, close your DAW and run the latest installer from your account. Your presets and activation are preserved.
System requirements
Requirements for AutoPitch.
| Operating system | Windows 10 or Windows 11 |
|---|---|
| Architecture | 64-bit (x64) |
| Plugin format | VST3AutoPitch also comes as a standalone app. |
| Host | A 64-bit DAW that loads VST3 plugins |
| macOS | Not yet |
| AutoPitch window | Resizable, with a 10:7 shapeOpens at 900 × 630 pixels. Resizes up to 1600 × 1120. |
| AutoPitch latency | Reported to your DAW, so playback stays in timeRoughly 50 ms or more with either Formants setting, depending on sample rate. You’ll hear it when monitoring live. |
AutoPitch settings
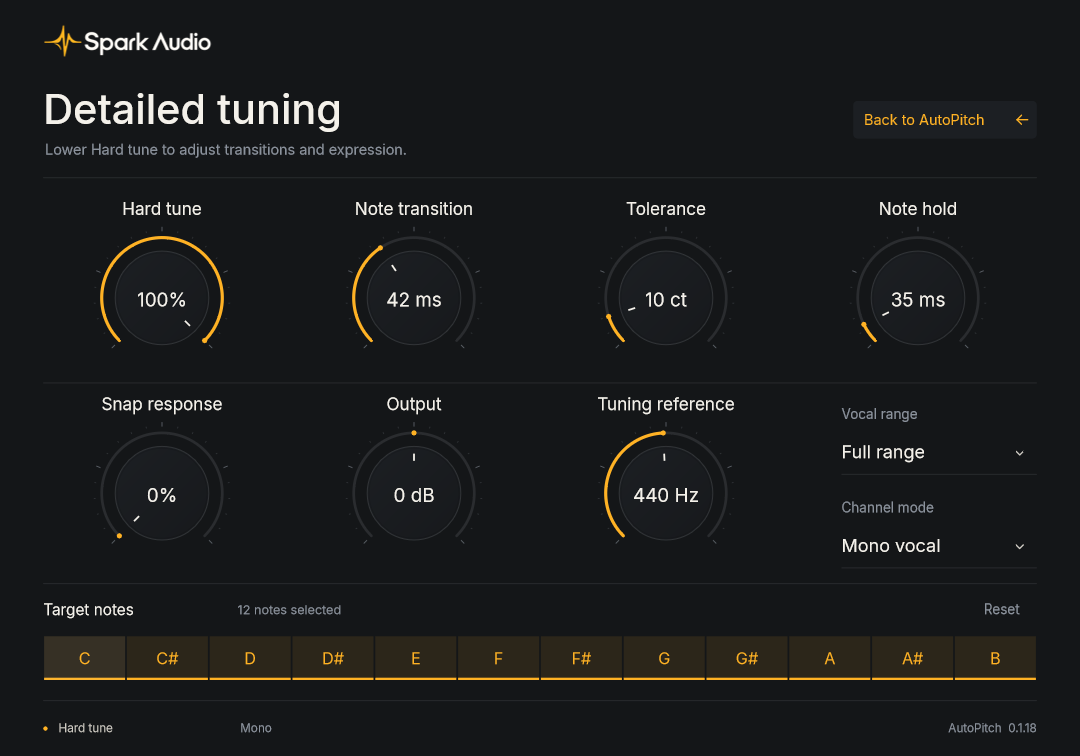
AutoPitch opens on three knobs, Retune speed, Correction and Humanize, with Key, Scale and Formants below them. Everything else lives in Detailed tuning: click Detailed tuning at the top right of the window to open it, and Back to AutoPitch to return. There’s no on/off switch in the window, so to compare with the untouched vocal, bypass AutoPitch in your DAW.
Set the key and scale
The default, Chromatic, pulls each note to the nearest of all twelve. That’s safe, but a note sung halfway between two can land on the wrong one. If the song is in A minor, choose Key A and Scale Minor, and AutoPitch only aims for those seven notes.
There are also Major, Major and Minor pentatonic, Blues, Dorian, Phrygian, Mixolydian, Whole Tone and Diminished. For anything else, click notes in the Target notes strip in Detailed tuning to build a Custom scale.
Choose the vocal range
In Detailed tuning, set Vocal range to Bass, Baritone, Tenor, Alto, Mezzo soprano or Soprano to match the singer. Matching the range helps the pitch detector. Full range, the default, covers the widest range.
Natural pitch correction
- Hard tune 0%
- Retune speed 35 ms
- Correction 85%
Start here for a lead vocal that drifts flat on long notes. With Hard tune lowered, lower Retune speed values react faster. Raise Humanize to keep more of the singer’s vibrato and inflection: it lets the voice move around each note while still correcting the note’s centre.
The hard-tuned effect
- Hard tune 100%
- Correction 100%
New instances already start this way. In an older session, open Detailed tuning and set Hard tune to 100%, then go back to the main page and set Correction to 100%. Setting Retune speed to 0 ms on its own won’t get you there.
At 100%, Hard tune overrides Retune speed, Humanize, Note transition, Tolerance and Note hold. You can see it in the window: Set by Hard tune appears under Retune speed and Humanize, and the footer reads Hard tune. Choose the key and scale first: in Chromatic every note is a target, including the ones that aren’t in the song.
Formants: Preserve or Shift
Shift lets the formants move with the pitch, and it’s the default for new instances. Preserve keeps the voice’s formants where they are while the pitch moves.
Switching to Preserve takes about a tenth of a second, ending in a short crossfade, so loop a phrase, try both, and keep whichever sounds more like the singer.
Mono vocal is the default
New instances average left and right into one centred voice before tuning, without a jump in level. That suits a vocal recorded with one microphone.
To keep a stereo recording’s width, choose Stereo under Channel mode in Detailed tuning. The footer of the window shows Mono or Stereo, so you can check at a glance. With Correction at 0% and Output at 0 dB, or with the plugin bypassed in your DAW, the original stereo signal passes through untouched.
Match the tuning reference
If the track wasn’t recorded at A4 = 440 Hz, set Tuning reference in Detailed tuning to match it. It goes from 415 to 466 Hz.
Adjusting controls
Drag a knob, use the mouse wheel or the arrow keys, double-click to reset it, or click the value and type an exact number. The window resizes too, if you want the controls bigger.
Common questions
Is there a Mac version?
Not yet. Spark plugins run on Windows 10 and 11, 64-bit. When a Mac version is ready, this page will say so first.
Which plugin formats do you support?
VST3, 64-bit, on Windows. AutoPitch also comes as a standalone app, which is handy for trying settings on a microphone without opening your DAW.
Will it work in my DAW?
Spark plugins are standard 64-bit VST3s, so any Windows DAW that loads VST3 should load them. We’re still testing in specific hosts. If something misbehaves, email us with the details listed below and we’ll look into it.
How does the free trial work?
30 days free, starting when you activate AutoPitch in the plugin. One trial per account and device. No card required. It does not renew or charge you automatically.
What’s in Spark Complete?
Spark Complete is a planned collection of AutoPitch, Compressor, EQ, Delay and Reverb. The bundle and the four other plugins are coming soon and are not available for purchase or download.
How do updates work?
Save your session and close your DAW, then download and run the latest installer from your account. Your presets, activation and saved session settings are preserved.
To hear when an update ships, email hello@sparkaudio.org and ask to be told about releases. You’ll get one short email per release and nothing else.
How do licensing and activation work?
Create an account and verify your email, then follow the activation instructions in your account. AutoPitch’s free trial lasts 30 days from first plugin activation. Each account and device can receive only one trial; reinstalling or creating another account does not restart it. Paid purchases are not open yet.
Can I use AutoPitch live?
It’s built for mixing. AutoPitch reports its latency to your DAW, so playback lines up, but you’ll hear roughly 50 ms or more of delay when monitoring through it, depending on sample rate.
Why does a new AutoPitch instance sound so obviously tuned?
AutoPitch defaults to Hard tune 100% and Correction 100%, with Retune speed at 5 ms and Humanize at 0%. For a subtler effect, try the settings under Natural pitch correction.
Contact
Email us for help with installation, your account or plugin issues.
What to put in your message
-
Your DAW and its version
Usually under Help or About in the DAW’s menus.
-
Your Windows version
Windows 10 or 11. Settings, then System, then About shows the exact version.
-
The plugin and its version
Shown in the footer of the plugin window.
-
What you expected, and what you heard
A sentence each is plenty. A short audio clip or a screenshot of your settings helps even more.